<?xml version="1.0" encoding="utf-8"?><feed xmlns="http://www.w3.org/2005/Atom" ><generator uri="https://jekyllrb.com/" version="3.10.0">Jekyll</generator><link href="/feed.xml" rel="self" type="application/atom+xml" /><link href="/" rel="alternate" type="text/html" /><updated>2026-04-09T14:46:58+00:00</updated><id>/feed.xml</id><title type="html">Pavel Kříž</title><subtitle>Code creatively, innovatively, securely and accurately</subtitle><entry><title type="html">VM Creep in Deployments</title><link href="/jekyll/update/2026/02/04/VM-Creep.html" rel="alternate" type="text/html" title="VM Creep in Deployments" /><published>2026-02-04T13:53:00+00:00</published><updated>2026-02-04T13:53:00+00:00</updated><id>/jekyll/update/2026/02/04/VM-Creep</id><content type="html" xml:base="/jekyll/update/2026/02/04/VM-Creep.html"><![CDATA[<p>Let’s imagine you are part of a small team preparing to deploy a new service. The first steps are already behind us, and now we are getting ready for production. Sounds great — let’s walk through the lifecycle of the service and watch how the VM count evolves over time.</p>

<h2 id="1-step-production">1. Step: production.</h2>

<p>Production, we need 3 VMs. Deploy and done. First users are joining! 🎉</p>

<ul>
  <li>production: 3 VMs</li>
  <li>total: <strong>3 VMs</strong></li>
</ul>

<h2 id="2-step-testing">2. Step: testing</h2>

<p>We got updates for the service! 📈 However we are no gigachads, so option to test in production is a no-go. Lets create a test environment with 3 VMs. It just works, nice.</p>

<ul>
  <li>production: 3 VMs</li>
  <li>testing: 3 VMs</li>
  <li>total: <strong>6 VMs</strong></li>
</ul>

<h2 id="3-step-scaling">3. Step: scaling</h2>

<p>New users are joining our service, we scale production: node scaling, load balancers, proxies 🚀</p>

<ul>
  <li>production: 16 VMs</li>
  <li>testing: 9 VMs</li>
  <li>total: <strong>25 VMs</strong></li>
</ul>

<h2 id="4-step--other-environments">4. Step  other environments</h2>

<p>Because our testing is far away to match our production, we introduce one production-similar last step test environment: staging. To support agile development, short-lived experimental environments start appearing… 🧪</p>

<ul>
  <li>production: 16 VMs</li>
  <li>staging: 16 VMs</li>
  <li>testing: 9 VMs</li>
  <li>experimental: 5 x 3 VMs</li>
  <li>total: <strong>56 VMs</strong></li>
</ul>

<h2 id="5-step-geo-redundancy">5. Step: geo redundancy</h2>

<p>Because we fear downtime and blackout (or something else relevant), we decide to introduce geo-redundant infrastructure to our system.</p>

<ul>
  <li>production: 2 x 16 VMs</li>
  <li>staging: 2 x 16 VMs</li>
  <li>testing: 2 x 9 VMs</li>
  <li>single site testing: 9 VMs</li>
  <li>experimental: 5 x 3 VMs</li>
  <li>total: <strong>106 VMs</strong></li>
</ul>

<h2 id="could-have-happened-at-any-step-bad-design-choice">(could have happened at any step): bad design choice</h2>

<p>We made a bed design step with all best intention. Eg: We dug too deep into microservice-oriented architecture and doubling VMs everywhere.</p>

<ul>
  <li>total <strong>212 VMs</strong></li>
</ul>

<h2 id="how-we-ended-up-there-and-was-it-inevitable">How we ended up there and was it inevitable?</h2>

<p>We have <strong>212 VMs</strong> plus multiple environments and this gets very expensive, not talking about the man-hour cost to manage all of it.</p>

<p>All the steps are reasonable by themselves, but when all combined it might easily get over our head. Quite often we can see at conferences/posts that these techniques are praised for their pros, but much less often the cons are mentioned as well. So we should ask ourselves every time if we really need it:</p>

<ul>
  <li>Testing: If it’s a rarely used service, would scheduled maintenance windows be enough to resolve issues directly in production?</li>
  <li>Scaling: Would vertical scaling be sufficient? Is there room for optimization instead?</li>
  <li>Staging: MCould a larger testing environment — something between testing and staging — catch most scale-related issues?</li>
  <li>Geo: How quickly can we restore from an offsite backup? Would that be sufficient instead of full geo-redundancy? In many cases, geo-redundancy only makes sense for truly global or critically high-availability services.</li>
</ul>

<p>None of these decisions are wrong on their own. Complexity grows when reasonable decisions accumulate without regular re-evaluation. Redundancy is not just about availability — it is about the operational cost we silently accept.</p>]]></content><author><name></name></author><category term="jekyll" /><category term="update" /><category term="DevOps" /><category term="Redundancy" /><category term="Environments" /><category term="Architecture" /><category term="DevOps Lessons" /><summary type="html"><![CDATA[Let’s imagine you are part of a small team preparing to deploy a new service. The first steps are already behind us, and now we are getting ready for production. Sounds great — let’s walk through the lifecycle of the service and watch how the VM count evolves over time.]]></summary></entry><entry><title type="html">Kubernetes Runner</title><link href="/jekyll/update/2026/01/29/GitLab-Runner-Kubernetes-Executor-copy.html" rel="alternate" type="text/html" title="Kubernetes Runner" /><published>2026-01-29T14:03:00+00:00</published><updated>2026-01-29T14:03:00+00:00</updated><id>/jekyll/update/2026/01/29/GitLab-Runner-Kubernetes-Executor%20copy</id><content type="html" xml:base="/jekyll/update/2026/01/29/GitLab-Runner-Kubernetes-Executor-copy.html"><![CDATA[<p><a href="https://docs.gitlab.com/runner/executors/docker_machine/">As GitLab deprecated the docker executor</a>:</p>

<blockquote>
  <p>The Docker Machine executor was deprecated in GitLab 17.5 and is scheduled for removal in GitLab 20.0 (May 2027).</p>
</blockquote>

<p>one of the two simple options for runner are now gone, one of which is docker runner and the other shell runner. But as shell runner runs into problem even when using only by one developer. Talking about security not being concern in one manned team but the environment is then kept the same for all jobs.</p>

<p><strong>Fortunately there is a Kubernetes executor runner</strong>. This might seem complicated at first, but it is not if we choose the right Kubernetes implementation. Well installing regular Kubernetes will be big overkill for small or one manned team, but there are also smaller installs of it like minikube. However minikube is not meant to be production ready, thus stuff like K3s or microK8s come into play. They can to be installed into both one node mode or multi-node mode. As K3s is quite powerful and easy to install it is not as straightforward as microK8s. <strong>With microK8s you just install with snap and we have set up Kubernetes</strong>.</p>

<p>Well if we have snap availible just running is enough:</p>

<div class="language-bash highlighter-rouge"><div class="highlight"><pre class="highlight"><code>snap <span class="nb">install </span>microk8s <span class="nt">--classic</span>
</code></pre></div></div>

<p>Now we have very easy live, we have all setup up and working. Kubectl and Helm are just availible like so:</p>

<div class="language-bash highlighter-rouge"><div class="highlight"><pre class="highlight"><code>microk8s kubectl get pod <span class="nt">--all-namespaces</span>
microk8s helm list <span class="nt">--all-namespaces</span>
</code></pre></div></div>

<p>and if we even need we are not stopped if we need to automate it as we can access the same directly with binaries.</p>

<p>As a last step we just install the runner with a helm chart as it come prebundled already!</p>

<h2 id="is-it-all-really-that-great">Is it all really that great?</h2>

<p>Yes and not, it all depends on the needs. One big downside is the fact that it is more a plug and play installation very suitable for experiments and such stuff as updates might be cumbersome. However we do have very good experience with it even in extensively used environments and as it cannot be updated as easily is not as a big of downside in case of runners as they do not keep any persistent settings other then these stored in manifests (our <code class="language-plaintext highlighter-rouge">.yaml</code>configs).</p>]]></content><author><name></name></author><category term="jekyll" /><category term="update" /><category term="Kubernetes" /><category term="DevOps" /><category term="GitLab" /><category term="GitLab Runner" /><category term="MicroK8s" /><category term="CI/CD" /><summary type="html"><![CDATA[As GitLab deprecated the docker executor:]]></summary></entry><entry><title type="html">Automated GitLab deployment in Cloud</title><link href="/jekyll/update/2025/03/23/GitLab-Haproxy-Docker-stack.html" rel="alternate" type="text/html" title="Automated GitLab deployment in Cloud" /><published>2025-03-23T17:25:45+00:00</published><updated>2025-03-23T17:25:45+00:00</updated><id>/jekyll/update/2025/03/23/GitLab-Haproxy-Docker-stack</id><content type="html" xml:base="/jekyll/update/2025/03/23/GitLab-Haproxy-Docker-stack.html"><![CDATA[<p>Why a interesting stack? Normally we would not use terraform (or OpenTofu) for such stuff, but rather use Docker Compose or Dockerfile. But maybe that is not what is the used stack, so for a demonstration we can use Terraform as well and a <code class="language-plaintext highlighter-rouge">kreuzwerker/docker</code> provider for infrastructure. This way we can manage containers locally instead of VMs. Another challange of this tech concept is not to use something more automated like <code class="language-plaintext highlighter-rouge">Traefik</code> as a proxy but rather manually set up our routing with <code class="language-plaintext highlighter-rouge">HAProxy</code> and automate the certificate ourselves with <code class="language-plaintext highlighter-rouge">Certbot</code>.</p>

<p>This short article will go over the terraform file which will show most of the connections and principles. The rest of the implementation is omitted for simplicity.</p>

<h2 id="1-haproxy">1. HAProxy</h2>

<p>First get all stuff like provider and images then start with HAProxy itself. Lets start with it as other container depends on it:</p>

<div class="language-tf highlighter-rouge"><div class="highlight"><pre class="highlight"><code><span class="k">resource</span> <span class="s2">"docker_container"</span> <span class="s2">"external_load_balancer"</span> <span class="p">{</span>
  <span class="nx">image</span> <span class="p">=</span> <span class="nx">docker_image</span><span class="p">.</span><span class="nx">haproxy</span><span class="p">.</span><span class="nx">image_id</span>
  <span class="nx">name</span>  <span class="p">=</span> <span class="s2">"external_load_balancer"</span>
  <span class="nx">restart</span> <span class="p">=</span> <span class="s2">"always"</span>
  <span class="nx">ports</span> <span class="p">{</span>
    <span class="nx">internal</span> <span class="p">=</span> <span class="mi">80</span>
    <span class="nx">external</span> <span class="p">=</span> <span class="mi">80</span>
  <span class="p">}</span>
  <span class="nx">ports</span> <span class="p">{</span>
    <span class="nx">internal</span> <span class="p">=</span> <span class="mi">443</span>
    <span class="nx">external</span> <span class="p">=</span> <span class="mi">443</span>
  <span class="p">}</span>
  <span class="nx">ports</span> <span class="p">{</span>
  	<span class="nx">internal</span> <span class="p">=</span> <span class="mi">22</span>
  	<span class="nx">external</span> <span class="p">=</span> <span class="mi">22</span>
  <span class="p">}</span>
  <span class="nx">networks_advanced</span> <span class="p">{</span>
  	<span class="nx">name</span> <span class="p">=</span> <span class="nx">docker_network</span><span class="p">.</span><span class="nx">gitlab_network</span><span class="p">.</span><span class="nx">name</span>
  <span class="p">}</span>
  <span class="nx">mounts</span> <span class="p">{</span>
  	<span class="nx">source</span> <span class="p">=</span> <span class="s2">"/MY_PROJECT_PATH/gld/data/certs/deploy-certs/"</span>
  	<span class="nx">target</span> <span class="p">=</span> <span class="s2">"/deploy-certs/"</span>
  	<span class="nx">type</span> <span class="p">=</span> <span class="s2">"bind"</span>
    <span class="nx">read_only</span> <span class="p">=</span> <span class="kc">true</span>
  <span class="p">}</span>
  <span class="nx">mounts</span> <span class="p">{</span>
    <span class="nx">source</span> <span class="p">=</span> <span class="s2">"/MY_PROJECT_PATH/gld/haproxy.cfg"</span>
    <span class="nx">target</span> <span class="p">=</span> <span class="s2">"/usr/local/etc/haproxy/haproxy.cfg"</span>
    <span class="nx">type</span> <span class="p">=</span> <span class="s2">"bind"</span>
    <span class="nx">read_only</span> <span class="p">=</span> <span class="kc">true</span>
  <span class="p">}</span>
<span class="p">}</span>
</code></pre></div></div>

<p>The ports noted are all the ports needed for GitLab, however Certbot is needing 80 port as well. This can be solved by HAProxy rule in its config to route requests on <code class="language-plaintext highlighter-rouge">/.well-known/acme-challenge/</code> subpath to Certbot. We cannot forgot about mounting the certificates so we can use them in HAProxy as well as the config.</p>

<h2 id="2-gitlab">2. GitLab</h2>

<p>GitLab itself is not hard to deploy on docker. Lets take a look on the deployment:</p>

<div class="language-tf highlighter-rouge"><div class="highlight"><pre class="highlight"><code><span class="k">resource</span> <span class="s2">"docker_container"</span> <span class="s2">"gitlab"</span> <span class="p">{</span>
  <span class="nx">image</span> <span class="p">=</span> <span class="nx">docker_image</span><span class="p">.</span><span class="nx">gitlab</span><span class="p">.</span><span class="nx">image_id</span>
  <span class="nx">name</span>  <span class="p">=</span> <span class="s2">"gitlab"</span>
  <span class="nx">restart</span> <span class="p">=</span> <span class="s2">"always"</span>
  <span class="nx">depends_on</span> <span class="p">=</span> <span class="p">[</span>
  	<span class="nx">docker_container</span><span class="p">.</span><span class="nx">external_load_balancer</span>
  <span class="p">]</span>
  <span class="nx">networks_advanced</span> <span class="p">{</span>
  	<span class="nx">name</span> <span class="p">=</span> <span class="nx">docker_network</span><span class="p">.</span><span class="nx">gitlab_network</span><span class="p">.</span><span class="nx">name</span>
  <span class="p">}</span>
  <span class="nx">mounts</span> <span class="p">{</span>
  	<span class="nx">source</span> <span class="p">=</span> <span class="s2">"/MY_PROJECT_PATH/gld/data/gitlab/config"</span>
  	<span class="nx">target</span> <span class="p">=</span> <span class="s2">"/etc/gitlab"</span>
  	<span class="nx">type</span> <span class="p">=</span> <span class="s2">"bind"</span>
  <span class="p">}</span>
  <span class="nx">mounts</span> <span class="p">{</span>
    <span class="nx">source</span> <span class="p">=</span> <span class="s2">"/MY_PROJECT_PATH/gld/data/gitlab/logs"</span>
    <span class="nx">target</span> <span class="p">=</span> <span class="s2">"/var/log/gitlab"</span>
    <span class="nx">type</span> <span class="p">=</span> <span class="s2">"bind"</span>
  <span class="p">}</span>
  <span class="nx">mounts</span> <span class="p">{</span>
    <span class="nx">source</span> <span class="p">=</span> <span class="s2">"/MY_PROJECT_PATH/gld/data/gitlab/data"</span>
    <span class="nx">target</span> <span class="p">=</span> <span class="s2">"/var/opt/gitlab"</span>
    <span class="nx">type</span> <span class="p">=</span> <span class="s2">"bind"</span>
  <span class="p">}</span>
<span class="p">}</span>
</code></pre></div></div>

<p>Note that gitlab depends on external load balancer and we have to bind all the three directories.</p>

<h2 id="busybox-server">Busybox server</h2>

<p>Before the last step we have to install the simplest webserver possible, <code class="language-plaintext highlighter-rouge">bussybox httpd</code>. That is because we are going to use the http challange of the acme protocol. This will be great because of <strong>zero downtime</strong> for the certificate renewal.</p>

<div class="language-tf highlighter-rouge"><div class="highlight"><pre class="highlight"><code><span class="k">resource</span> <span class="s2">"docker_container"</span> <span class="s2">"busybox_httpd"</span> <span class="p">{</span>
  <span class="nx">image</span> <span class="p">=</span> <span class="nx">docker_image</span><span class="p">.</span><span class="nx">busybox</span><span class="p">.</span><span class="nx">image_id</span>
  <span class="nx">name</span>  <span class="p">=</span> <span class="s2">"busybox_httpd"</span>
  <span class="nx">restart</span> <span class="p">=</span> <span class="s2">"always"</span>
  <span class="nx">networks_advanced</span> <span class="p">{</span>
  	<span class="nx">name</span> <span class="p">=</span> <span class="nx">docker_network</span><span class="p">.</span><span class="nx">gitlab_network</span><span class="p">.</span><span class="nx">name</span>
  <span class="p">}</span>
  <span class="nx">mounts</span> <span class="p">{</span>
    <span class="nx">source</span> <span class="p">=</span> <span class="s2">"/MY_PROJECT_PATH/gld/data/certs/www"</span>
    <span class="nx">target</span> <span class="p">=</span> <span class="s2">"/var/www"</span>
    <span class="nx">type</span> <span class="p">=</span> <span class="s2">"bind"</span>
    <span class="nx">read_only</span> <span class="p">=</span> <span class="kc">true</span>
  <span class="p">}</span>
  <span class="nx">command</span> <span class="p">=</span> <span class="p">[</span>
  	<span class="s2">"httpd"</span><span class="p">,</span> <span class="s2">"-f"</span><span class="p">,</span> <span class="s2">"-v"</span><span class="p">,</span> <span class="s2">"-p"</span><span class="p">,</span> <span class="s2">"80"</span><span class="p">,</span> <span class="s2">"-h"</span><span class="p">,</span> <span class="s2">"/var/www"</span>
  <span class="p">]</span>
<span class="p">}</span>
</code></pre></div></div>

<p>Note that we have to mount the webpages folder shared with Certbot.</p>

<h2 id="certbot">Certbot</h2>

<p>As the last step we are going to spin up the Certbot container that will move the files to the served folder and will take care of the certificate request and renewal.</p>

<div class="language-tf highlighter-rouge"><div class="highlight"><pre class="highlight"><code><span class="k">resource</span> <span class="s2">"docker_container"</span> <span class="s2">"certbot"</span>  <span class="p">{</span>
  <span class="nx">image</span> <span class="p">=</span> <span class="nx">docker_image</span><span class="p">.</span><span class="nx">certbot</span><span class="p">.</span><span class="nx">image_id</span>
  <span class="nx">name</span> <span class="p">=</span> <span class="s2">"certbot"</span>
  <span class="nx">restart</span> <span class="p">=</span> <span class="s2">"always"</span>
  <span class="nx">depends_on</span> <span class="p">=</span> <span class="p">[</span>
  	<span class="nx">docker_container</span><span class="p">.</span><span class="nx">external_load_balancer</span>
  <span class="p">]</span>
  <span class="nx">networks_advanced</span> <span class="p">{</span>
  	<span class="nx">name</span> <span class="p">=</span> <span class="nx">docker_network</span><span class="p">.</span><span class="nx">gitlab_network</span><span class="p">.</span><span class="nx">name</span>
  <span class="p">}</span>
  <span class="nx">mounts</span> <span class="p">{</span>
    <span class="nx">source</span> <span class="p">=</span> <span class="s2">"/MY_PROJECT_PATH/gld/data/certs/www"</span>
    <span class="nx">target</span> <span class="p">=</span> <span class="s2">"/var/www/"</span>
    <span class="nx">type</span> <span class="p">=</span> <span class="s2">"bind"</span>
  <span class="p">}</span>
  <span class="nx">mounts</span> <span class="p">{</span>
    <span class="nx">source</span> <span class="p">=</span> <span class="s2">"/MY_PROJECT_PATH/gld/data/certs/letsencrypt"</span>
  	<span class="nx">target</span> <span class="p">=</span> <span class="s2">"/etc/letsencrypt/"</span>
  	<span class="nx">type</span> <span class="p">=</span> <span class="s2">"bind"</span>
  <span class="p">}</span>
  <span class="nx">mounts</span> <span class="p">{</span>
    <span class="nx">source</span> <span class="p">=</span> <span class="s2">"/MY_PROJECT_PATH/gld/data/certs/deploy-certs"</span>
  	<span class="nx">target</span> <span class="p">=</span> <span class="s2">"/deploy-certs"</span>
  	<span class="nx">type</span> <span class="p">=</span> <span class="s2">"bind"</span>
  <span class="p">}</span>
  <span class="nx">mounts</span> <span class="p">{</span>
  	<span class="nx">source</span> <span class="p">=</span> <span class="s2">"/MY_PROJECT_PATH/gld/cert-deploy-script.sh"</span>
  	<span class="nx">target</span> <span class="p">=</span> <span class="s2">"/etc/letsencrypt/renewal-hooks/deploy/cert-deploy-script.sh"</span>
  	<span class="nx">type</span> <span class="p">=</span> <span class="s2">"bind"</span>
    <span class="nx">read_only</span> <span class="p">=</span> <span class="kc">true</span>
  <span class="p">}</span>
  <span class="nx">command</span> <span class="p">=</span> <span class="p">[</span>
    <span class="s2">"certonly"</span><span class="p">,</span> <span class="s2">"--webroot"</span><span class="p">,</span> <span class="s2">"--webroot-path"</span><span class="p">,</span> <span class="s2">"/var/www"</span><span class="p">,</span> 
    <span class="s2">"--non-interactive"</span><span class="p">,</span> <span class="s2">"--agree-tos"</span><span class="p">,</span> <span class="s2">"-m"</span><span class="p">,</span> <span class="s2">"gitlab-team@example.com"</span><span class="p">,</span> 
    <span class="s2">"-d"</span><span class="p">,</span> <span class="s2">"my-gitlab.example.com"</span><span class="p">,</span>
  <span class="p">]</span>
<span class="p">}</span>
</code></pre></div></div>

<p>Here we can see, that we don’t only make the interconnection with HAProxy to pass it the certificates, but we have to use the webserver path to serve the files for the acme challenge to renew certificates.</p>

<h2 id="why-and-why-not">Why and why not</h2>

<p>This is probably not the most common solution to do the same functionality. We can imagine tech-stack such as <em>Traefik</em>, <em>docker-compose</em> and <em>GitLab</em> all in docker to fill in the same functionality. However the stack might not be available, or this one might suit better the overall tech or skills. One big advantage is the ease of change to VMs, just one has to implement shared storage. Also proxy like <em>HAProxy</em> is more performant then <em>Traefik</em>.</p>]]></content><author><name></name></author><category term="jekyll" /><category term="update" /><category term="DevOps" /><category term="GitLab" /><category term="GitLab Omnibus" /><category term="Teraform" /><category term="HAProxy" /><category term="Docker" /><category term="Automated certificates" /><summary type="html"><![CDATA[Why a interesting stack? Normally we would not use terraform (or OpenTofu) for such stuff, but rather use Docker Compose or Dockerfile. But maybe that is not what is the used stack, so for a demonstration we can use Terraform as well and a kreuzwerker/docker provider for infrastructure. This way we can manage containers locally instead of VMs. Another challange of this tech concept is not to use something more automated like Traefik as a proxy but rather manually set up our routing with HAProxy and automate the certificate ourselves with Certbot.]]></summary></entry><entry><title type="html">Multispectral Textural Benchmark - unique cloud application</title><link href="/jekyll/update/2023/08/11/MultispectralTexturalBenchmark.html" rel="alternate" type="text/html" title="Multispectral Textural Benchmark - unique cloud application" /><published>2023-08-11T21:25:45+00:00</published><updated>2023-08-11T21:25:45+00:00</updated><id>/jekyll/update/2023/08/11/MultispectralTexturalBenchmark</id><content type="html" xml:base="/jekyll/update/2023/08/11/MultispectralTexturalBenchmark.html"><![CDATA[<p><strong>Application runs at <a href="https://texture.utia.cas.cz">texture.utia.cas.cz</a></strong>.</p>

<p><strong>Post content</strong>
First the idea is introduced, then the features and future features are explained and in the end the used architecture and technologies brief description is elaborated.</p>

<h1 id="why-is-there-need-for-such-apllication">Why is there need for such apllication</h1>

<p>
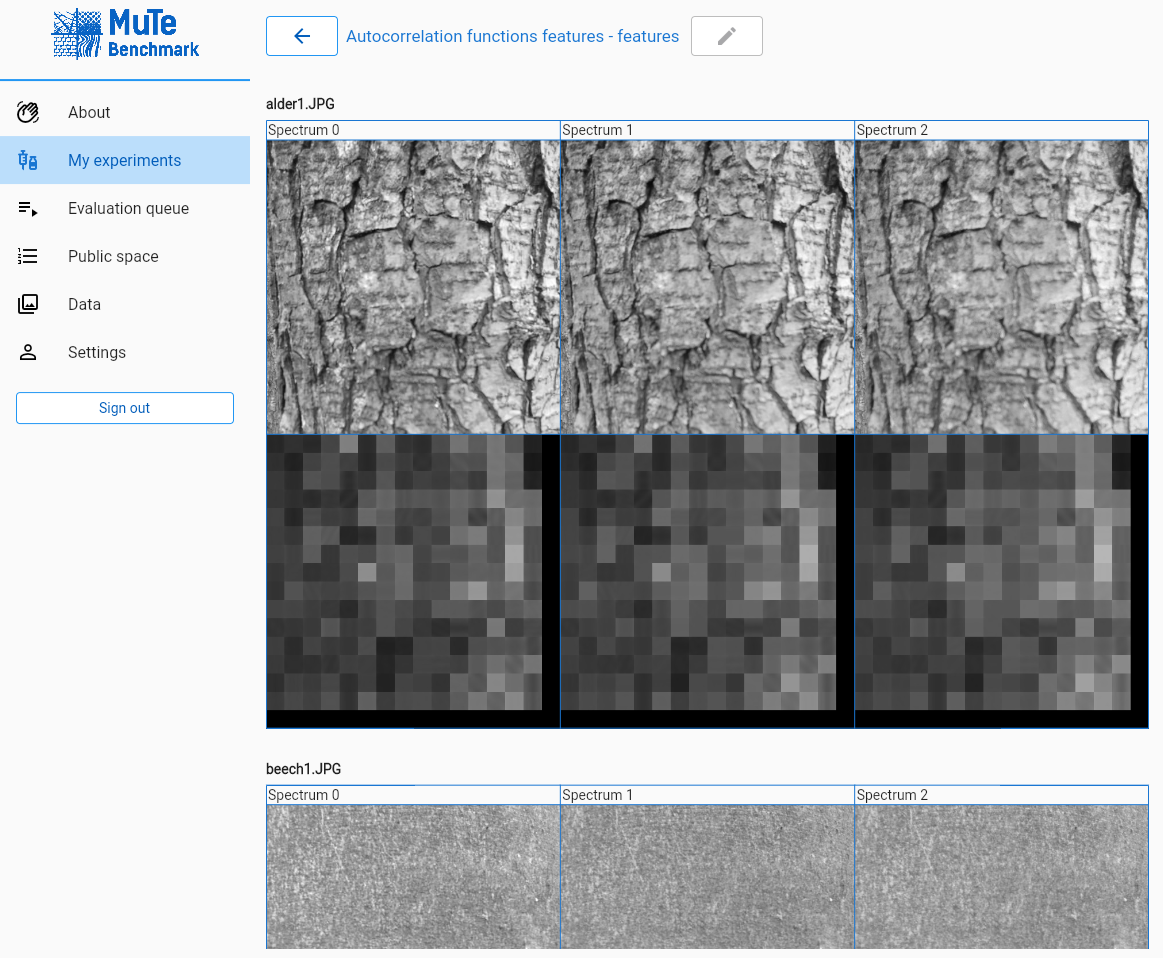
Texture features are specific data extracted for a wide variety of tasks, such as in computer vision. There are many algorithms for extracting these features, but each one has different characteristics. Although comparative studies have been written, they are often limited by the number of features and the specific testing environment. So there is no tool or resource in which to universally compare textural features. Maybe until now. The developed benchmark does just that. The benchmark can test and evaluate features universally for multispectral data (for any number of spectra).</p>

<h1 id="application">Application</h1>

<p>I would like to briefly introduce the application. Where you can:
<strong>Managing own experiments</strong>
<img src="/images/MultispectralTexturalBenchmark/my-experiments.png" width="*90*%" class="align-center" /></p>

<p><strong>
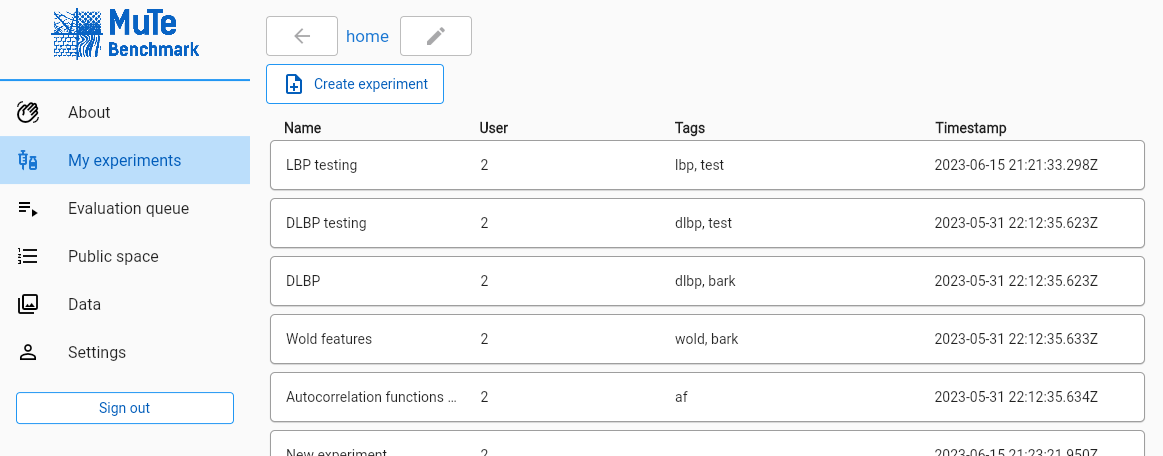
Exploring experiments of others</strong>
<img src="/images/MultispectralTexturalBenchmark/public-experiments.png" width="90%" class="align-center" /></p>

<p><strong>
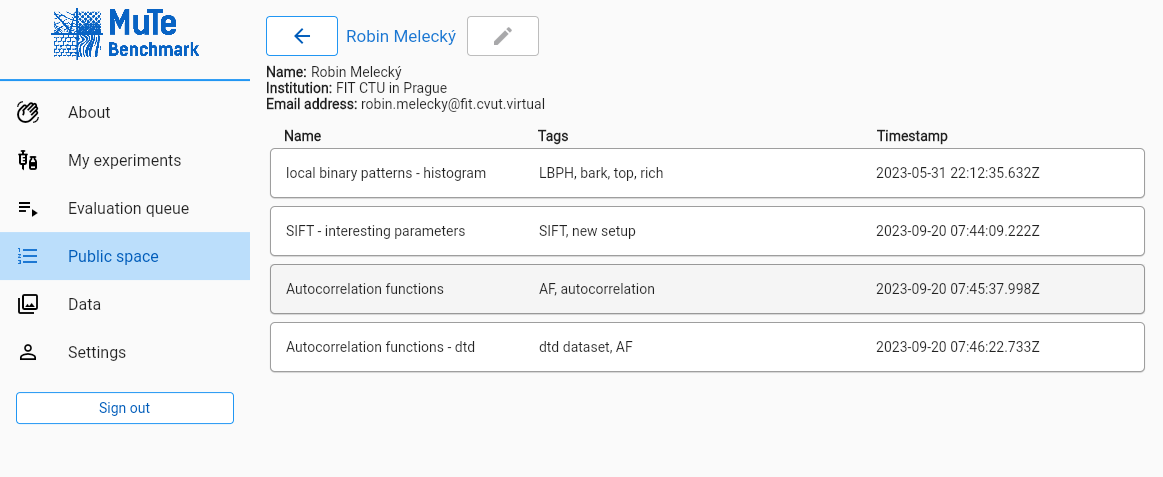
Setup and run an experiment and the view the results in detail</strong>
<img src="/images/MultispectralTexturalBenchmark/experiment.png" width="90%" class="align-center" /></p>

<p><strong>
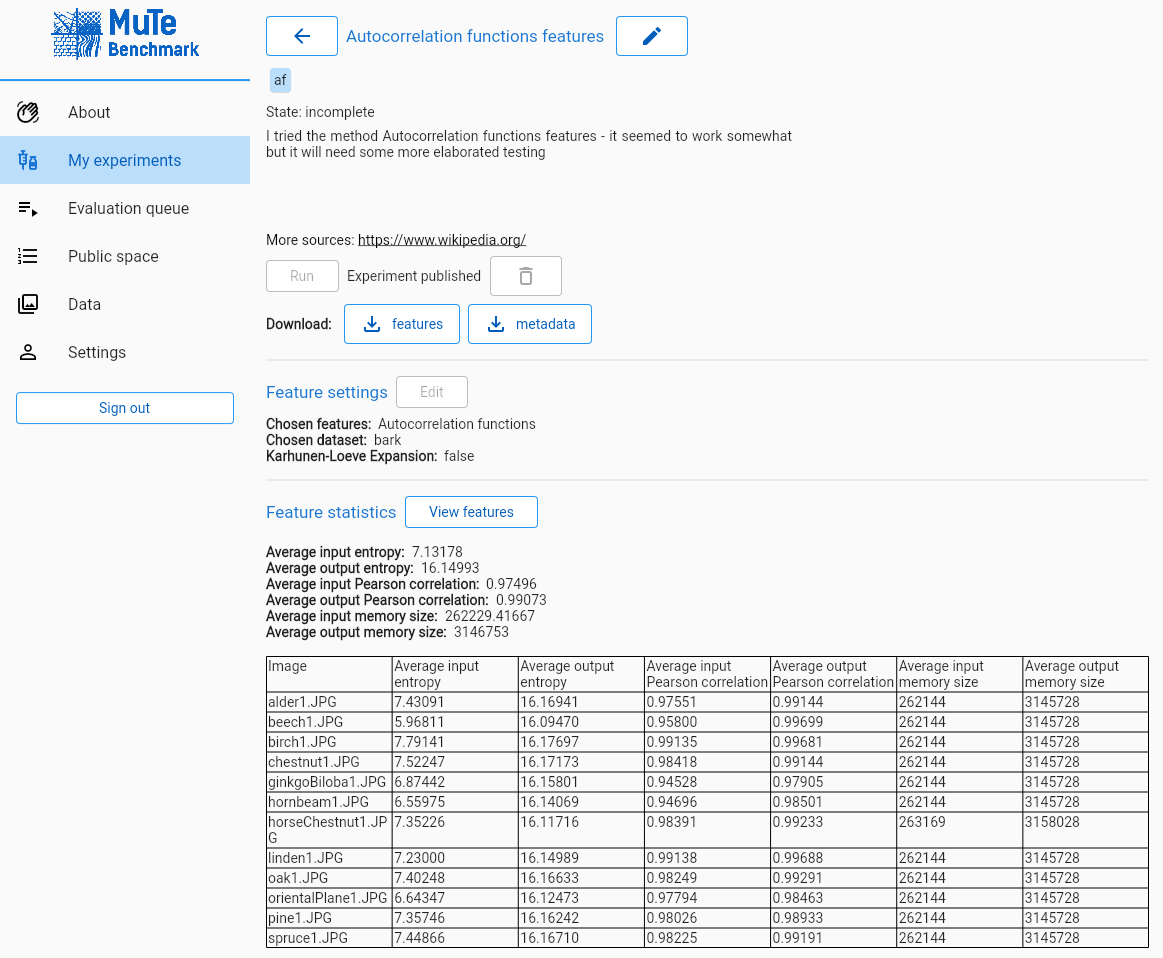
Visualize the features</strong>
<img src="/images/MultispectralTexturalBenchmark/experiment-visualization.png" width="90%" class="align-center" /></p>

<p><strong>Future application features</strong>
The benchmark is still in development and I work on it in my free time, there are going to be added following essential application features soon:</p>
<ul>
  <li>Algorithm comparison</li>
  <li>User input of features</li>
</ul>

<p>and other application features:</p>
<ul>
  <li>more features</li>
  <li>more evaluation criteria</li>
  <li>choice of criteria</li>
</ul>

<h1 id="architecture-and-technologies">Architecture and technologies</h1>

<p>It is a web application with cloud computing and symptom evaluation. The entire benchmark is divided into a client application and a server part.</p>

<p><img src="/images/MultispectralTexturalBenchmark/MUTE-system-architecture.drawio.png" width="89%" /></p>

<p>
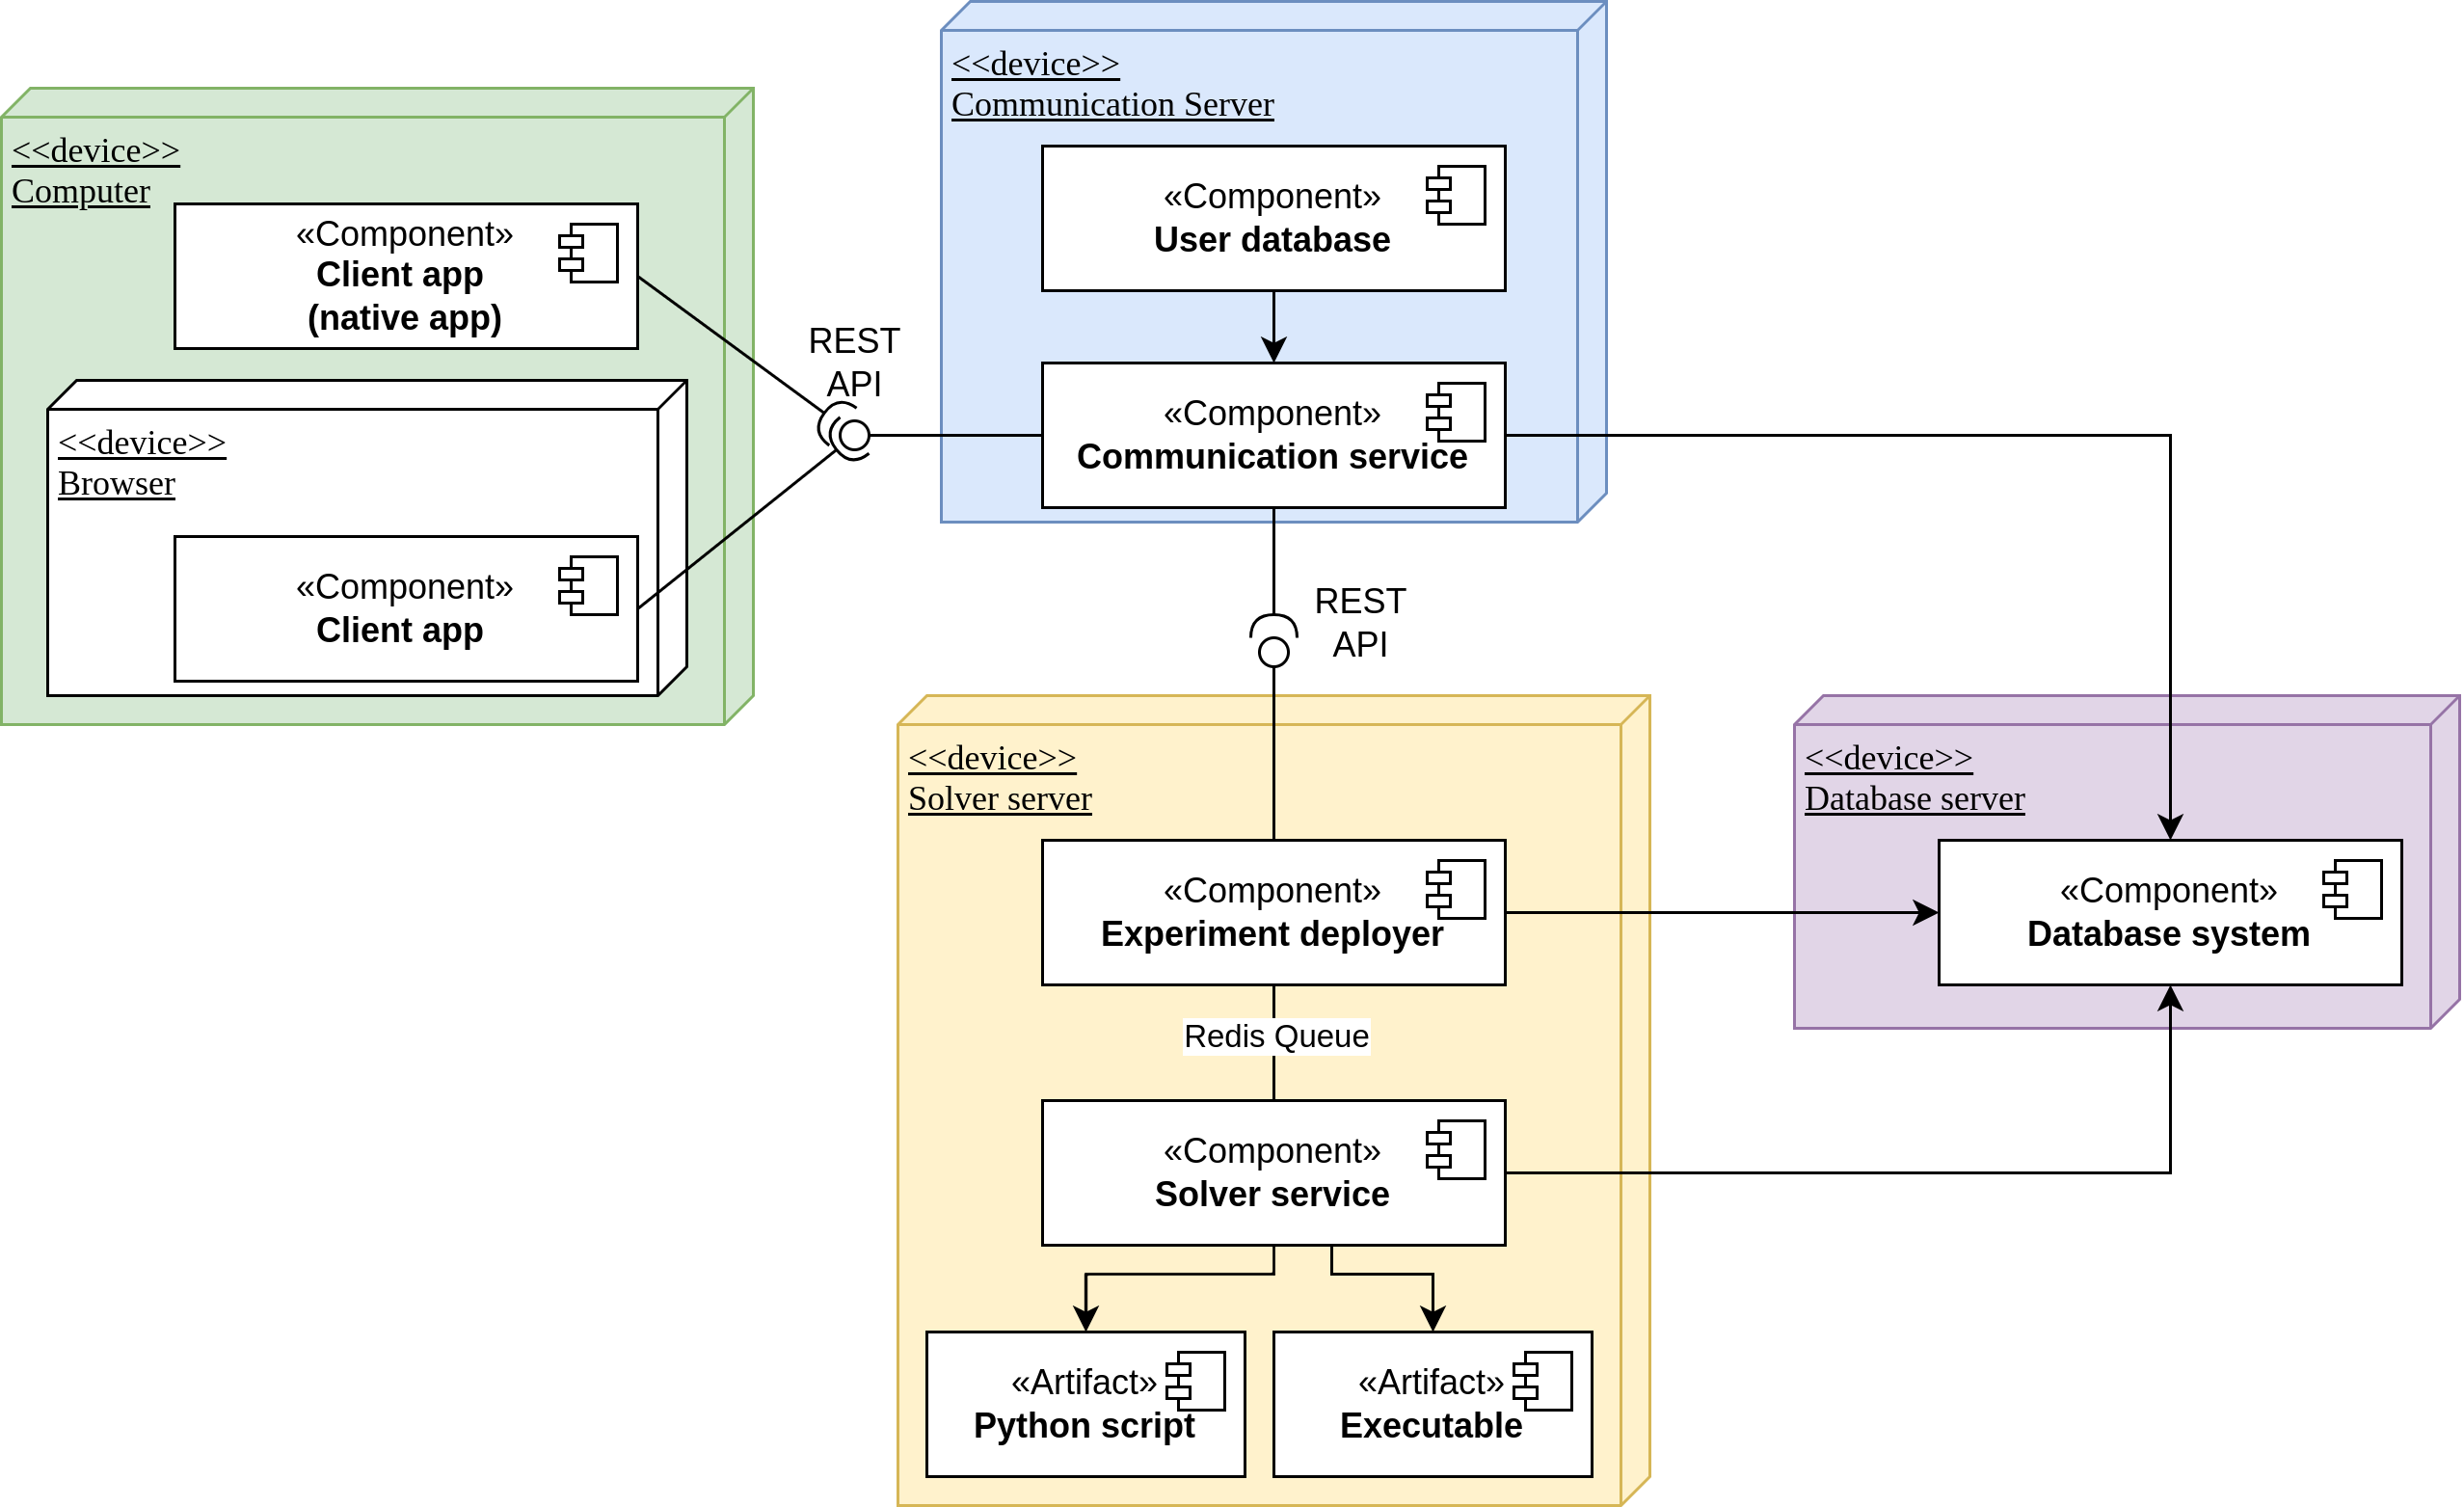
The client application is programmed using the Flutter framework, and since it is a multi-platform technology, it can be deployed not only as a web application but also as a native application for Windows or Linux.</p>

<p>The server part of the application is then created using three servers: a communication server, a solution server and a database server. The communication server serves the web application and provides security and sends requests that it cannot handle to the resolving server (typically requests for the extraction and evaluation of texture features). The solving server then contains a queue for the extraction and evaluation of features, which is served by workers, the amount of which can be scaled and the overall performance of the benchmark can be scaled. Both previously mentioned servers then communicate with the database server (MongoDB), in which they store and retrieve data. In the server part, Python and the Flask framework are used for the most part, but also, for example, binary files compiled from C++ subprograms containing feature extraction algorithms. These are then supplemented with Python subprograms with the same purpose.</p>]]></content><author><name></name></author><category term="jekyll" /><category term="update" /><category term="Python" /><category term="Flask" /><category term="Flutter" /><category term="Apache" /><category term="REST" /><category term="C" /><category term="C++" /><category term="MongoDB" /><category term="SQL" /><category term="Redis Queue" /><summary type="html"><![CDATA[Application runs at texture.utia.cas.cz.]]></summary></entry><entry><title type="html">Webcam pulse detector - live heart rate detection</title><link href="/jekyll/update/2022/02/09/Pulse-detector.html" rel="alternate" type="text/html" title="Webcam pulse detector - live heart rate detection" /><published>2022-02-09T10:06:34+00:00</published><updated>2022-02-09T10:06:34+00:00</updated><id>/jekyll/update/2022/02/09/Pulse-detector</id><content type="html" xml:base="/jekyll/update/2022/02/09/Pulse-detector.html"><![CDATA[<h2 id="idea">Idea</h2>
<p>Main idea is about creating application in Python, that would detect and display the pulse frequency. The output values are between 55 and 170 for one person.</p>

<h2 id="descritption">Descritption</h2>
<p>The application looks like this:</p>

<p><img src="/images/Pulse_detector_images/Pulse_detector.png" width="80%" /></p>

<p>In the previous image can be seen the main part of the application, which is displayed in two windwos. The camera settings is easy and with the face locking mechanism is visible on the next images:</p>

<p><img src="/images/Pulse_detector_images/Pulse_detector_camera_setup.jpg" width="40%" /></p>

<p><img src="/images/Pulse_detector_images/Pulse_detector_face_setup.jpg" width="40%" /></p>

<p>It is good to note, that on first sight unpractical face locking, is actualy important for the accuracy of meassurements.</p>

<h3 id="accuracy">Accuracy</h3>

<p>The accuracy was tested with the fitness armband Fitbit Charge 4, which meassures heartrate on the wrist (quite accurate armband at the time). It was shown that the accuracy of the meassurements is only approximate (same as in other seen and tested solutions) and mainly depends on the camera quality and video compression. It was tested on four cameras total on which three gave normal accuracy (among the set) and using one of them the application gave much more accurate results.</p>

<p>There is one image frm testing which shows happy case, when the detections matches (the real one still might be bit different):</p>

<p><img src="/images/Pulse_detector_images/happy.jpg" width="30%" /></p>

<p>On this image the innacuracy is visible. The overall is wrong, but at the moment, the current pulse was meassured correctly (most dominant frequency):</p>

<p><img src="/images/Pulse_detector_images/not_so_happy.jpg" width="30%" /></p>

<h2 id="installation-and-run">Installation and run</h2>
<p>The <code class="language-plaintext highlighter-rouge">Python 3</code> is needed with the installed package <code class="language-plaintext highlighter-rouge">opencv-python</code> (tested with version 4). To run the program it is needed to type <code class="language-plaintext highlighter-rouge">python3 ./pulse_detector.py</code> in the correct folder in terminal.</p>

<h2 id="other-already-created-solutions-at-the-time">Other already created solutions at the time</h2>
<p>There are already existing solutions for that, one of them is <a href="https://github.com/thearn/webcam-pulse-detector">webcam-pulse-detector</a>. That one is in Python, but there is also one in <a href="https://github.com/serghov/heartRate">Javascript</a>. Most detectors (our as well) uses forehead as detecting zone, but <a href="https://www.youtube.com/watch?v=IV51CYZsBOU">this one</a> uses cheeks.</p>]]></content><author><name></name></author><category term="jekyll" /><category term="update" /><category term="Python" /><category term="OpenCV" /><summary type="html"><![CDATA[Idea Main idea is about creating application in Python, that would detect and display the pulse frequency. The output values are between 55 and 170 for one person.]]></summary></entry><entry><title type="html">Structural, behavioral and creational patterns study</title><link href="/jekyll/update/2021/12/09/MVC.html" rel="alternate" type="text/html" title="Structural, behavioral and creational patterns study" /><published>2021-12-09T21:25:45+00:00</published><updated>2021-12-09T21:25:45+00:00</updated><id>/jekyll/update/2021/12/09/MVC</id><content type="html" xml:base="/jekyll/update/2021/12/09/MVC.html"><![CDATA[<p><img src="/images/mvc/adp_semestralka.png" alt="In game image" title="Class diagram" />
The class diagram of the project in which one cas recognize the individual implemented design patterns (open the image in a new tab to get the full view and zoom). 
<img src="/images/mvc/mvc2.jpg" alt="In game image" title="In game image" /></p>]]></content><author><name></name></author><category term="jekyll" /><category term="update" /><category term="Java" /><category term="Maven" /><category term="JavaFX" /><summary type="html"><![CDATA[The class diagram of the project in which one cas recognize the individual implemented design patterns (open the image in a new tab to get the full view and zoom).]]></summary></entry><entry><title type="html">Phone localization using computer vision better than GPS</title><link href="/jekyll/update/2021/05/15/phone-localization.html" rel="alternate" type="text/html" title="Phone localization using computer vision better than GPS" /><published>2021-05-15T07:37:34+00:00</published><updated>2021-05-15T07:37:34+00:00</updated><id>/jekyll/update/2021/05/15/phone-localization</id><content type="html" xml:base="/jekyll/update/2021/05/15/phone-localization.html"><![CDATA[<ul>
  <li><strong>Application goal:</strong> visualize historical look of already changed buildings (and other projects)</li>
  <li><strong>Implemented part:</strong> accurate localization solution</li>
  <li><strong>Solved problem:</strong> insufficient accuracy of phones GPS, compass and gyroscope sensors</li>
  <li><strong>Used technologies:</strong> <code class="language-plaintext highlighter-rouge">C</code>, <code class="language-plaintext highlighter-rouge">C++</code>, <code class="language-plaintext highlighter-rouge">OpenCV</code>, <code class="language-plaintext highlighter-rouge">Boost</code></li>
</ul>

<h2 id="results">Results</h2>

<p>The resulting localization accuracy is higher by using this solution than by using GPS and other mobile sensors. The accuracy was tested on multiple tests and the accuracy gain by using the <strong>implemented solution was on average 11.94 meters more accurate than GPS</strong> It can be visualized by following example.</p>

<div style="text-align:center">
<p float="left">
<img src="/images/phone-localization/Vrsovice2_loc.jpg" width="39%" />
<img src="/images/phone-localization/Vrsovice2_vol.jpg" width="39%" />  
</p>
</div>

<p>On the left is aerial map and on the right is the detected location of localized house.</p>
<ul>
  <li><strong>yellow line</strong>: house facade</li>
  <li><strong>green pin</strong>: calculated location</li>
  <li><strong>cyan pin</strong>: GPS sensor location</li>
</ul>]]></content><author><name></name></author><category term="jekyll" /><category term="update" /><category term="C++" /><category term="OpenCV" /><category term="Boost" /><category term="Microsoft Visual C++" /><summary type="html"><![CDATA[Application goal: visualize historical look of already changed buildings (and other projects) Implemented part: accurate localization solution Solved problem: insufficient accuracy of phones GPS, compass and gyroscope sensors Used technologies: C, C++, OpenCV, Boost]]></summary></entry><entry><title type="html">Digitization and automatization of historical heritage</title><link href="/jekyll/update/2020/10/31/heritage-digitization.html" rel="alternate" type="text/html" title="Digitization and automatization of historical heritage" /><published>2020-10-31T07:37:34+00:00</published><updated>2020-10-31T07:37:34+00:00</updated><id>/jekyll/update/2020/10/31/heritage-digitization</id><content type="html" xml:base="/jekyll/update/2020/10/31/heritage-digitization.html"><![CDATA[<p><a href="https://modely.cesnet.cz">Website with digitized models</a> containing selected digitized models which have been digitized by CESNET.</p>

<p>I have done or been included on many object digitizations but namely I have worked on the <a href="https://modely.cesnet.cz/en/staromestska_madona.html">The Old Town Madonna</a> and <a href="https://modely.cesnet.cz/en/truhla.html">New Town Shoemaker’s Guild Chest</a> and I think that these are the nicest of these I worked on. The goal of the work was to <strong>automatize</strong> the digitization process as much as possible, that was done using <code class="language-plaintext highlighter-rouge">Python</code> scripting.</p>

<p float="left">
<img src="/images/heritage-digitization/socha.jpg" width="49%" />
<img src="/images/heritage-digitization/truhla.jpg" width="49%" />
</p>]]></content><author><name></name></author><category term="jekyll" /><category term="update" /><category term="Python scripts" /><category term="Blender" /><category term="RealityCapture" /><summary type="html"><![CDATA[Website with digitized models containing selected digitized models which have been digitized by CESNET.]]></summary></entry><entry><title type="html">PACMAN Remastered: Optimized game engine with customizations</title><link href="/jekyll/update/2020/06/17/Configurable-Pacman.html" rel="alternate" type="text/html" title="PACMAN Remastered: Optimized game engine with customizations" /><published>2020-06-17T16:37:34+00:00</published><updated>2020-06-17T16:37:34+00:00</updated><id>/jekyll/update/2020/06/17/Configurable-Pacman</id><content type="html" xml:base="/jekyll/update/2020/06/17/Configurable-Pacman.html"><![CDATA[<style>

.container{
      position: relative;
      width: 50%;
}

.image {
  display: block;
  width: 100%;
  height: auto;
}

.overlay {
  position: absolute;
  top: 0;
  bottom: 0;
  left: 0;
  right: 0;
  height: 100%;
  width: 100%;
  opacity: 0;
  transition: .5s ease;
  background-color: #000000;
}

.upper_overlay {
  position: absolute;
  top: 0;
  bottom: 0;
  left: 0;
  right: 0;
  height: 20%;
  width: 100%;
  opacity: 0;
  transition: .5s ease;
  background-color: #000000;
}


.container:hover .overlay {
  opacity: 0.7;
}

.container:not(:hover) .overlay{
  height: 10%;
  opacity: 0.5;
}


@media only screen and (max-width: 1000px) {
  .text {
  color: white;
  font-size: 3vw;
  position: absolute;
  top: 3%;
  left: 3%;
}
}

@media only screen and (min-width:1001px) { 
.text {
  color: white;
  font-size: 1vw;
  position: absolute;
  top: 3%;
  left: 3%;
}
}
</style>

<div class="container" style="float: left">
  <img src="/images/Configurable_pacman/pacman.png" class="image" />

  <div class="overlay">
    <div class="text">Graphics <br /> the game uses the sdl2 library for c++ in 2D mode </div>
  </div>
</div>

<div class="container" style="float: right">
  <img src="/images/Configurable_pacman/pacman_live_lost.png" class="image" />
  <div class="overlay">
    <div class="text">On a hunt <br /> Eat all the points on the map while being hunted by the ghosts. Try to eat the big points and eat them down as well</div>
  </div>
</div>

<div class="container" style="float: left">
  <img src="/images/Configurable_pacman/map.png" class="image" />
  <div class="overlay">
    <div class="text">Create your map <br /> Using the map config file you can create the levels yourself as you wish</div>
  </div>
</div>

<div class="container" style="float: right">
  <img src="/images/Configurable_pacman/pacman_covid.png" class="image" />
  <div class="overlay">
    <div class="text">Hard mode <br /> The covid hunts you in the hardest mode of the game. </div>
  </div>
</div>

<div class="container" style="float: right">
  <img src="/images/Configurable_pacman/config.png" class="image" />
  <div class="overlay">
    <div class="text">Configurable game <br /> You can configure multiple parameters that determines the hardness of the game or the mode of the game</div>
  </div>
</div>

<div class="container" style="float: left">
  <img src="/images/Configurable_pacman/pacman_level_done.png" class="image" />
  <div class="overlay">
    <div class="text">Next level <br /> You go to next level when you collect all the points on the map. The next level is harder accordingly</div>
  </div>
</div>

<div style="clear: both;"></div>

<div style="margin-bottom: 2cm;">
</div>

<p><br /></p>]]></content><author><name></name></author><category term="jekyll" /><category term="update" /><category term="C++" /><category term="SDL 2.0" /><category term="CMake" /><category term="Make" /><summary type="html"><![CDATA[]]></summary></entry><entry><title type="html">The Drake - strategic turn-based game</title><link href="/jekyll/update/2019/12/15/theDrake.html" rel="alternate" type="text/html" title="The Drake - strategic turn-based game" /><published>2019-12-15T15:45:00+00:00</published><updated>2019-12-15T15:45:00+00:00</updated><id>/jekyll/update/2019/12/15/theDrake</id><content type="html" xml:base="/jekyll/update/2019/12/15/theDrake.html"><![CDATA[<p>The class diagram of the project(open the image in a new tab to get the full view and zoom). 
<img src="/images/mvc/thedrakeProject.png" alt="In game image" title="Class diagram" /></p>
<h1 id="game-description">Game description</h1>
<p>Starting phase: first the players need to put down their basic units (the Drake and two Clubmen). 
<img src="/images/the_drake/game0.jpg" alt="Starting phase" title="Starting phase" />
Game phase: after placing the basic units players can start to play. They play in turns and in each of them the player can place a unit or move one of their units on the board. The goal of the game is to capture the enemies units (similarly as in chess). The game ends when one player captures Drake of the opposite player.</p>

<p>The complication is that each unit has different pattern of moving. The possible directions of movement are switching with the unit moves as well. 
<img src="/images/the_drake/game0.jpg" alt="Game phase" title="Game phase" /></p>]]></content><author><name></name></author><category term="jekyll" /><category term="update" /><category term="Java" /><category term="JavaFX" /><summary type="html"><![CDATA[The class diagram of the project(open the image in a new tab to get the full view and zoom). Game description Starting phase: first the players need to put down their basic units (the Drake and two Clubmen). Game phase: after placing the basic units players can start to play. They play in turns and in each of them the player can place a unit or move one of their units on the board. The goal of the game is to capture the enemies units (similarly as in chess). The game ends when one player captures Drake of the opposite player.]]></summary></entry></feed>